Out of all the free speaker box simluation programs, WinISD is the best I've used. A common trend I've seen is for many to fail to use it's complete functionality. The result is often an incomplete design that still needs some work.
Download WinISD from Linearteam >
1. Starting your project
First click on "new project" and select your driver from the list. If it isn't included, see the next section below. Select the box type - sealed, vented, bandpass. Then select an alignment.
Sealed box - start with a Q of 0.707
Vented - not critical as you will end up tweaking it anyway
2. Getting Started - Adding a new driver
Often you have to manually enter in the driver data where it doesn't exist in the built-in database. People often get stuck here as the parameters shown on a data sheet will result in errors. The correct way to enter the parameters without errors is shown in my blog post about entering a new driver > It also includes a quick video demonstration.
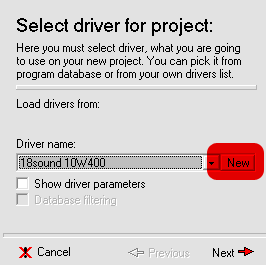
Click new to add a new driver.
3. Choose box type and alignment
In this example, I've chosen the Peerless XLS 12" driver which is already in the database. It's in a vented box, shown below with the box chosen by one of the box alignments included with WinISD. It doesn't matter which you chose (I never follow them anyway!)
So far the response doesn't look good! Let's see why:
The box is too small and the tuning is too low. The size of the box affects the efficiency of the vent. If we made the box larger, yet kept the vent tuning the same, the vent output would increase. We can see this below where the yellow trace shows an oversized 150L box.
The two peaks with the dip in the middle tells us that the design needs work.
This particular driver has a strong motor which gives it a low Qts, causing early roll off.
4. Modify box parameters
More sensible numbers: 60L volume and 20 Hz tuning
5. Enter filter settings
On the EQ tab, enter the following parameters:
Low pass - 2nd order, 50 Hz
High pass - 3rd order, 20 Hz
Static gain - 6db
The low pass is the crossover point you see on the dial on the plate amp, 2nd order is typical. The high pass is a "rumble filter" the filters out low frequencies below the tuning point. This is necessary to keep the cone under control. Static gain is simply to make the chart easier to read, so we can see where the -3db points are (purple line).
You can see the -3db points at 23 and 80 Hz.
Notice two things:
1. The setting for your crossover isn't where it will actually cross
2. The hump at 100 Hz is now gone - we've filtered it out
If you have a data sheet for your plate amp, then you should aim to match it's response with your filter settings.
To change the chart displayed, click on the red area. Shown above is the filter response. This is what the filters are doing.
6. Find maximum output
EQ tab - disable static gain
Signal tab - enter power from your amp
Now view the cone excursion chart and increase the input power until you reach xmax (see red line).
Notice how the excursion below tuning is lower than the peak which occurs around 30 Hz. This is due to the rumble filter. A third order filter at tuning will achieve this. When using a plate amplifier, you will be limited to what has been designed for it, but ideally if you have a choice, 3rd order is ideal. Let's see what happens without a rumble filter:
The driver goes out of control and when played at this level, which would be safe with the filter, we now have potential damage. Instead of enjoying your movie, you jump out of your seat and run to your subwoofer to turn it down as you hear it bottom. If there is a lot of deep bass as found in many movies, you'll have to turn it down a great deal.
SPL:
We've now found the maximum output of the sub.
7. Vent design
First we'll start with a 100mm vent. The length is 932mm and we select the end correction for two flanged ends. At this point you need to work out if you can fit such a vent inside a 60L box.
Now let's check the vent velocity.
You can see the peak occurs at tuning. How do you know what velocity is acceptable? This is a topic of it's own and is covered here >
Let's see what happens without the rumble filter:
Now the vent velocity is far too high. The result is both audible chuffing and port compression. We now have poor performance and the driver itself also suffers potential damage. One thing should now be clear - you need a rumble filter for a vented box!
Juggling compromises
To get a good design, you will need to juggle different compromises and cycle through different changes. Each change will affect other areas. If you decide the vent won't fit, then you might make the box bigger - that will mean the same vent can be shorter as the volume is part of the equation affecting the required vent length. This in turn affects the excursion and amplifier input power you can use. You can save your project, then open a second instance of it for comparison. You then show different versions on the one chart.
April 21, 2010
April 16, 2010
Fixing TDL RTL3 transmission line speakers
Above: On the left are my custom made transmission line speakers, with the TDL RTL3s on the right and a Diva Acoustics stand mount on top.
British speaker manufacturer TDL made a few popular speakers in the 90s that retailed in Australia for around $1100. Many considered them better than the alternatives at the price. Recently I fixed up a pair with blown tweeters (common problem with this speaker), and had a chance to open up the box to see what's inside, run them actively and compare to my own TL speakers and a pair of modest Diva speakers. How do they compare to the other two speakers? Are they really transmission line speakers? Read on!
I'm recently fixed up some TDL RTL3 transmission line speakers with blown tweeters. It's a classic case of pushing speakers too hard with an amp that doesn't have a lot of juice. It's not hard to see what went wrong.
On the binding posts you can see warped plastic suggesting a heat issue. Opening it up I could see that a 10W resistor in the woofer network had heated up and it was sitting up against the plastic part of the binding posts. The solder had come loose - it got hot enough to soften the solder! Yes, this speaker has seen it's share of late night parties cranked up to within an inch of it's life and then some! Apparently it's common for this speaker to suffer this fate. A Google search reveals many others have searched before for a replacement tweeter.
I believe part of the reason is that the tweeter wasn't padded. A 3db pad would have doubled the power handling, given a more natural voicing and possibly saved the tweeter from a thermal meltdown. Read more about Lpads for tweeters >
Both tweeters were blown. On the outside they looked fine, but the voice coil wire has melted. Finding a replacement would have been an easy fix, and I thought I'd have a chance considering it's a Vifa. Sadly no success - I could only find another Vifa 3/4" D19. This isn't the same as the original tweeter, which is a Vifa D20TD. The two are very similar, but the original is a silk dome while the D19 is a poly dome and at the time of writing, you can still buy them even though it's a discontinued tweeter.
The Diva stand mounts shown in the photo were purchased second hand as a cheap way of sourcing the tweeter, which is the Vifa D19.
In the end, I managed to buy the tweeter from Brian Maddern at Decibel hifi. Brian was very helpful and makes regular purchases from Parts Express. If you are buying just a pair of cheap tweeters like this, PE have a minimum order. Brian was happy to add the tweeter to his order and ship it to me for a great price. Brian is a good source for things that aren't easy to find. In the past I also purchased some cable and "cable pants" that I couldn't find elsewhere locally. What are cable pants? They are a moulded rubber sock that allows you to make neat speaker cables when using multi core cable.
Cable pants and speaker cables at Decibel >
I managed to get this in another speaker going cheaper than getting a pair of tweeters - Diva speakers shown bunyip listed for a friend. These speakers were surprisingly good and very listenable. The vifa mids had balsa wood placed on the cones very much like a cheaper version of the slitted Scan Speak Revelator midwoofers.
Part 1 - replacing the tweeters with second hand units
I modified the baffle cutout for the new tweeter, inserted it in to the crossover. The new tweeter has a slightly bigger magnet, so the inside cutout needs to be filed back.
Unfortunately, something was clearly wrong. The sound was muffled in one speaker and I discovered that one tweeter was not working well. This can be seen in a quick measurement:
Frequency response: Blue - full range, black - tweeter only, red - faulty tweeter only
Due to less than ideal measurement conditions, only the treble response data is valid. The black line and red lines show the two tweeters with identical input. As you can see, the red shows a loss in efficiency. The tweeter dome had been pushed in, and while I was able to get it back out with the vacuum cleaner, it's no longer useful. The level is 12 db less above the crossover point! This is where I went to Brian at Decibel to source a new tweeter.
Part 2 - new tweeter
When I installed the new tweeter, everything changed. I evaluated by ear with familiar reference tracks and felt that the sound was now as it should be. The owner was very happy with the result. I did consider and discuss the possiblity of reworking the crossover, but in the end we both decided that it wasn't necessary. I simply added a 3 db L-pad.
A word of caution
Generally, it's not possible to simply put in a new tweeter without changing the crossover. In this case, it worked out fine. As a general rule I suggest not to try it unless you are prepared to either re-design the crossover or risk getting a bad result and throwing away the driver. At the very least, compare the data sheets.
Is it a true TL speaker?
The interior of the box turned out to be a surprise. Typically a TL speaker would have a long folded tube so that the entire box is actually a tapered tube. In this case there was simply a slot port that has a taper. It seems to tune the speaker in the midbass range, but it is certainly not a transmission line. Instead it's a vented box with a slot port that hasn been filled with dacron. This gives the bass a different quality and the stuffing makes the midrange more like a true TL - neutral and fairly open.
Comparing the three speakers
How do the TDL speakers sound? Quite good for their price range. I believe the treble without the pad is a bit tizzy, but with a simple pad this improves. I found the sound was very similar to my TL speakers and at times you could mistake one for the other. The midbass driver is polycone and has a similar sonic signature. Due to the stuffing, it achieves a midrange not normally found at this price, however, compared to my TLs there is a certain graininess that draws some attention and stands in the way of the illusion of performers in the room.
In the bass, my TLs are clearly in another class. This is where it becomes clear that the TDLs are sadly not what they were marketed to be - a true TL speaker. We also can't expect too much of the cheaper drivers used, which are part of what holds it back. There is about an octave less of extension. While mine get down to around 23 Hz in room, these roll off in the midbass around 50 Hz. I have some room mode peaks in that range, so when these speakers are run without any bass EQ they really do sound quite boomy. If they are combined with high quality subwoofers that are well integrated, then they do get quite close to the sound of mine and there is only the slight midrange grain issue. That's pretty good performance when you consider that the TLs are equivalent to AU $5k speakers.
The Diva speakers need the subs to compare, since they have a sealed box rolling off at 80 Hz. They are quite comparable to the TDLs and their RRP is about half. Being a sealed box speaker filled with dacron they also have a nice neutral midrange. The midbass driver is at the same approximate price and quality, however it's been modified with balsa reinforcement on the cone. It's a similar technique to Scan Speak Revelator drivers which are high end drivers costing a great deal more. If I had to pick a winner I'd say the Divas have a slight edge in the midrange and unlike the TDLs I could not pick any specific fault. They aren't equal to my TLs either, but they come closer than you might guess.
It could be that in a more rigorous comparison the difference would become more clear, but I compared in a fairly casual way to satisfy my curiosity. Both of these speakers challenged my ideas about how well budget speakers can perform. The only problem is that they both require decent subwoofers - neither of them have finesse, fidelity and capability in the bass. If you have read the rest of my blog you will realise that I don't think much of small speakers as bass drivers.
Do you want a real TL speaker?
Look elsewhere. There is nothing special about the bass of the TDLs. I've built a much better TL and they will suit the purists who prefer 2 channel without subs. If you want a real TL then DIY is the best bet. Sadly you can't always trust the marketing guys. If you are in Australia, consider a TL6 kit at The Loudspeaker kit (yes, that is their actual name). TL6 kit > That is one way around the driver availability issue.
Opening up some budget speakers
I recently bought some Diva loudspeakers for the tweeters:
Diva loudspeakers on StereoNET
Thought some might find this interesting, so I'll write just a tad more about them.
Very surprising sound indeed. Better than they have a right to sound. Apparently, according to Troels Gravesen, the midwoofer is one where "things just come together, and the performance is beyond the price." I'm inclined to agree. The tweeter is a little cheaper than we are used to seeing in DIY projects, but actually does a pretty good job. The photos here give a hint to the balsa wood that was stuck on the cones, very much like Scan Speak.
In the past I've suggested that people needed to spend a certain amount to get good sound, but some recent experiences have challenged that. A reasonably handy person could put together something like these VERY CHEAPLY. These would suit a student struggling to scrape together a few hundred. Previously I'd thought around $1k or maybe $800 with a bit of corner cutting. Scratch that. You don't even need to spend that much. Set up correctly, these cheapies could shock seasoned ears. I've heard much more pricey high end speakers with more obvious faults.
So why the balsa wood?
The idea is to increase the rigidity of a light paper cone without adding much weight. Sadly they didn't do a good job and the foam surround is damaged. Hidden behind the grille you can't tell and they still work fine.
Now this would be interesting. If I were to set up a blind test with these hooked up with the subs, I wonder how much people would guess as a price for the speakers!
So what is the future of these? Well with the tweeters gone to repair another speaker, I plan to keep the boxes with the woofers. I'll see if they pass for surrounds, at least until I build some serious ones.
April 11, 2010
5 DIY subs
If you are planning to build a DIY subwoofer, here are 5 options that you might consider. They are based on some of the best value products available for budget conscious enthusiasts, and their popularity is based on their performance and value.
The drivers are Exodus Audio Shiva X2 and Tempest X2 which are 12” and 15” drivers respectively. The amps are O Audio subwoofer plate amps. The drivers have been chosen for their value for money, and suitability for music and home theatre applications. The amplifiers have been chosen for their flexibility. There are many different plate amps available, but most lack the sensible controls that allow for proper filtering as needed for a subwoofer. It’s common for many plate amps to have poorly chosen filtering which results in them being unsuitable for serious use without modifications.
The fifth sub uses a Behringer power amplifier EP4000 which provides very high output, but requires a separate sub crossover which would typically mean a small DIY electronics project. This might be more than many are prepared for, but for those who want to get the most output possible, it’s worth the effort.
Overview
1. Shiva X2 - 45L sealed – O Audio 300w
2. Shiva X2 - 80L vented – O Audio 300w
3. Tempest X2 – 150L sealed - O Audio 500w
4. Tempest X2 – 300L vented - O Audio 500w
5. Tempest X2 – 300L vented – Behringer Europower EP4000
Drivers:
Shiva X2 Tempest X2
Exodus Audio Website >
Amps: O Audio 300 & 500w plate amps
O audio Website >
Behringer Europower EP4000
These subs range from 109 – 119 db predicted maximum output at 1m half space. If built as designed and correctly configured, the driver will never exceed xmax regardless of the material used and the vented versions will never chuff. The only exception is #5 where the extreme power capacity of the Behringer amp means there is enough power to drive the sub beyond safe excursion limits. It’s necessary to carefully determine the limits by trial and error where you intend to get close to the limits then make sure you don’t even set the gain above a safe level.
Sub #1 is the budget compact choice that you’d best hide from your partner. It lacks EQ and extension and relies on room gain, which you can never count on. Sub #2 is a little more impressive but still retains a reasonable size. Being a vented high excursion sub, it presents more of a construction challenge – read on for advice on how to beat commercial vent options. Sub #3 with a more powerful amp and bigger driver achieves slightly more output in a sealed box. It’s simpler to build than a vented box and has just the right balance of features for most people. If you are unsure which to build, choose this one. Sub #4 is twice the size and is all about how much output and extension we can squeeze out of that driver with the O Audio amp. It not only plays deeper than the sealed version, it also achieves about the same output of two of sub #4 with only a slight increase in cost. Sub #5 doubles the amp cost and gives us up to about 50% more output again, but if you want to get really serious about bass and get a second sub, you already have the amp.
All of these subs will perform very well for music and movies if integrated properly. The main differences to consider are the construction challenges, size, depth and output. If you are using EQ for the bass with a unit like Behringer FBD or Ultracurve then the extension is not so important as having the desired headroom.
Common Settings
The O Audio plate amps are modeled with a high pass filter (HPF) which serves to prevent excessive cone excursion. Some music and DVD material includes very low bass, which can bottom drivers and cause excessive vent velocity leading to compression and unavoidable vent chuffing. This ultra low frequency content adds nothing useful and it makes sense to filter it out. Each sub has a 4th order Linkwitz Riley low pass crossover set at 80 Hz. This will integrate best with sealed main speakers set to small which should mean they will receive a 2nd order high pass filter at 80 Hz. The result will be a symmetrical 4th order summed crossover.
Shiva X2 subs
The sealed version is simple and compact – only 45L is needed for adequate damping. To keep it low cost the lower powered amp is chosen, but this doesn’t allow for EQ. One might choose the 500w amp for this reason, otherwise we are counting on room gain and unless you have measured your room, this isn’t a good idea. You may not get the room gain others on every audio forum will tell you to expect – many who tell you such things have never measured a real room. The vented version is almost twice the size and has impressive performance at the cost of added complexity.
For this sub to work well we need a 120mm diameter PVC vent 970mm long! That means either a tall sub, or at least one bend, with care needed to ensure it is as smooth as possible. The vent should be mounted to two sheets of 18mm MDF with a flare at each end. The simple way is to use a roundover bit on the router – the biggest you can find which is typically around 32mm in radius. The cost is around AU $75 for such a bit but it can prove useful for speaker baffles as well to reduce baffle edge diffraction. The vent velocity will peak at just under 19 m/s.
A typical design would include a 100mm vent with a 12mm radius on the roundover, and many would run this without a rumble filter. The result is a vent velocity of 35 m/s, almost double what we have achieved! The vent being smaller will itself only handle 20 m/s and the flare would need to be 54mm diameter to avoid adding extra turbulence. By using the rumble filter and a larger vent, we cut down the size of the problem dramatically. As a result we only need a small flare that is easily achieved. A little more effort and care means we’ve achieved much greater performance with a vent that won’t chuff when the sub is pushed hard. It will also suffer much less port compression. High velocity in a vent causes the vent to gradually “lock up” and restrict the output. This shows up in many commercial subs when measured as severe compression.
If all this sounds like too much hassle, then you might spend a little more on a bigger driver that can achieve the output without a vent.
Tempest X2 subs
The extra output achieved with the bigger driver and amp isn’t much to get excited about, especially where the box is quite a bit bigger and the driver is actually working harder. The vented Shiva only uses 14mm of excursion, while the sealed Tempest uses all of it’s excursion for a similar output level. However, many feel that a sealed sub provides a tighter response. Whether this characteristic is due to the frequency response or is a trait related to sealed vs vented designs is a matter for debate.
For those that want to reach THX levels, we need a bigger vented box. A THX sub should achieve 115 dB output, allowing for a level 10 db higher than the mains, which should be capable of 105 dB. Achieving this level in your listening position isn’t as easy to predict as you might think.
The Tempest is a driver designed for a big box. The larger box allows extra efficiency down low. If we step the size up to 300L, we can now exceed 115 dB with an F3 below 20 Hz. The excursion is now down to a lower level at 19mm. If we want to go one step further, we can get up to 119 dB with the more powerful pro amp. We need more than twice the power to do it, and we now use up all the excursion of the driver. If this isn’t enough, the pro amp will power a second sub easily, but you will need to contend with the noisy fan and come up with an external subwoofer crossover.
Which one should I choose?
Firstly, consider your performance requirements. For high output, the pro amp option makes sense – you have all the power you could want from the start, and if you want more you already have another amp channel. Be prepared to do something about the fan noise and getting a crossover. This all involves extra effort and hassle, but for those who really want the extra punch, it’s worth it.
Most won’t need this and will appreciate the simplicity of a plate amp. If you want a small budget home theatre sub, choose the vented Shiva with the 300w plate amp. Be prepared for some extra challenge with the vent. If it seems too much, then spend a bit more and get the Tempest with more power. If small size and simplicity is critical, then pair the Shiva with the 500w plate amp which has EQ included unless you are happy with a music only sub or are sure you have enough room gain to achieve more bottom end.
While all this might sound confusing, the decision mainly comes down to size, performance and cost. All of the above can perform well or poorly.
More than any other audio component, a sub requires proper integration. If you are serious about doing it right, a measurement microphone and mic pre along with software are essential tools. This equipment will allow you to choose the best location, use the correct settings and include the best eq settings.