April 30, 2011

How to design an acoustic diffuser panel

The information here will help you quickly design your own. You may prefer to simply build from a dimensioned plan, however, persist with this quick guide and you will soon have your own custom version that can be sized for your own requirements.

Diffuser primer >

1. Download QRD calculator >

This is a free application that makes it easy.

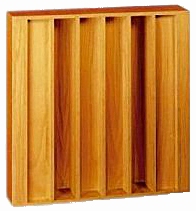
2. Choose the number of wells for each module

3. Choose either the depth or the lowest design frequency

Choosing one will determine the other. The region above 1k is critical for imaging, hence it is a good idea to aim for your panel to operate to that point at least.

4. Check the listening distance

5. Check the fin width

6. Decide on 1D or 2D

If your panel is 2D then click 2D from the top menu.

Now you have all the information that you need. Grab the calculator and work out how much material you will need. 3mm MDF would work well for the fins, but for the wells you may choose something a little thicker to make it easier. Keep in mind that if 18mm MDF is used, the panels will become heavy and more difficult to mount.

For more information, read the guide written by Collo, who designed this free application.

Diffuser panels: why you need them and how to make your own

An acoustic diffuser is generally more difficult to design and build, hence more expensive. They are also a little more difficult to integrate into a room. In the average room they are a rarity, but are often seen in high end rooms and recording studios. Do you really need one in your room?


Diffusion vs Absorption

An acoustic absorber simply absorbs sound waves and such a panel can be placed anywhere it is needed to reduce the overall room reverberation and address the most damaging reflections. In many domestic rooms, a point is quickly reached where the room begins to sound dead. Diffusers can be used to address problemmatic reflections without absorbing their energy. Instead, an incident sound wave is dispersed equally in all directions. This has two effects; the first is that a strong first reflection is reduced and the second is that the energy is redirected so that it remains in the room but the sound arrives later and at a lower level, having travelled a longer path. A further benefit is that a small room actually sounds bigger when treated with diffusion, while a room treated only with absorption tends to sound more controlled until it becomes dead.

Placement considerations

Absorbers can be placed anywhere in a room, but diffusers are subject to placement rules.

1. Minimum listening distance

Diffusers become ineffective at close range. The minimum distance depends on the specific panel. Often 1m or more will be required, but where a listening position is close to a wall behind, a low profile diffuser may allow a distance of 0.5m.

2. Diffusers have more impact when the path of relatively early reflections

If sound waves have reflected off multiple boundaries before reaching the panel, their impact will be reduced.

3. Diffusers have a limited effective bandwidth

Based on their geometry, an upper and lower limit is established. One typical example would be a 150mm deep diffuser with an effective bandwidth of 1 - 7 kHz.  One octave below it becomes progressively less effective and below about 500 Hz, sound waves will behave as if reaching a flat wall.

4. Don't overdo it!

There is such a thing as too much diffusion, and it's likely to create imaging confusion!

Types of diffusers

Most diffusers are either 1D or 2D. A common example is the QRD (Quadratic Residue Diffuser). It is popular because it is one of the simplest. A 1D QRD is the very simplest, and works in one direction.

In this example, an RPG unit is shown. Diffusion occurs horizontally. If rotated 90 degrees, it would work vertically.

A 2D QRD works in both directions.


Quite similar is the Skyline diffuser, which is essentially the same thing without the grid.


Confusion over diffusion!

There are some panels that are confused with diffusers, when in fact they could be best described as scatterers. Panels that feature curves or small pyramids are not true diffusers. Curved panels simply create more specular reflections. They are like a curved mirror, while a true diffuser is more like a matte painted wall.

The unfortunate aspect of this is that panels that aim to look more artistic will tend to compromise their performance. Repeating panels and designs based on equations yield the best results. 


Mixed panels

Some products include absorption as well as diffusion. Real Traps diffusors are filled with rigid fibreglass so that they transition to absorption below their effective diffusion range. This means they add a small amount of bass trapping, so if enough is used, the bass performance will also improve. Other products also aim to absorb over a wider bandwidth.


Do you want to design or build your own?

An acoustic diffuser is an ideal DIY project. They are easy to design. Design your own >

More about Diffusers >

April 29, 2011

Bass trap couch

Can a couch also work effectively as a bass trap? That depends partially on where it is placed. If in the middle of a room, it isn't likely to be very effective. However, if you are in a small room where you are forced to place the couch very close to the rear wall, then it can work quite well as a bass trap. A couch is a fairly large area of a foam near the floor to wall junction. You can make it more effective by putting foam between the couch and the wall, and foam that fills in the space between the couch and the floor. The difference is shown here:


Comparing the two it seems that peaks and dips are changed. Not all the changes are an improvement. The dip just above 100 Hz related to boundary interference is made effectively worse, but this is mainly because it remains while the level comes up on either side. Minor dips are added around 150 Hz, but the peak and dip higher up are both smoothed out. 

Overall I'd call it a slight improvement and some improvement in the decay time is also seen. This is a good result, especially considering that no extra space is taken up in the room. A single foam mattress was placed in between the couch and wall. Most of the improvement is in the lower midrange, above 80 Hz.

Do small foam traps actually work?

The short answer is NO! Small foam "bass traps" achieve very little. Foam traps must be oversized in order to be effective, because foam isn't the ideal material. If you put four foam single bed mattresses in four vertical corners, you would get an acceptable result, but the 1x1ft foam wedges sold as bass traps are well short of being enough. Shown below is what I call a "minitrap" which is about 0.3 x 0.3 x 2m in size, placed in a corner.


Here you can see the response is virtually identical. When bass trapping is adequate, we should at least see the Q of the peaks smoothed out. 


The waterfall shows a more complete picture. Again it confirms no real improvement. A great deal more trapping is required. Grey is the empty room, green is with the minitrap.

April 25, 2011

How does the bass of speakers combine in a room?

What happens when you combine the bass response of two speakers? I'm referring to their real-world behaviour that you hear from your listening position, when all of their room-related peaks and dips are combined together?

We expect the bass level to be increased by 6 db. Do we actually get this much increase?

Do the peaks and dips average out? Or do they combine in a more complex way?

This chart shows two subs measured individually, with an average calculated response. This isn't the same as what you will measure if you measure them together. The response doesn't average out like this.


Peaks sum together. Dips don't subtract. Responses don't average peaks and dips. Where phase interference doesn't occur this will hold true and the combined response will be equal to or greater than the sum of all peaks.

Here you can see the measured response of two subs - left (green) and right (red) and the two combined (black). 


The shaded regions show where the left sub has a lower level (shaded green), or where it has a higher level (red). The combined response more closely matches that of the right sub where it is higher. The most obvious deviation is the peak at 44 Hz where the left sub has higher output. Below 25 Hz the behaviour changes and room gain appears to have some additional influence.


At the upper end of the modal range, we see some patterns more clearly. Here the combined response tracks that of the louder right sub even more closely. The dip at 100 hz remains because both subs have it, however the combined level is the lesser of the two. The dip around 140 Hz is eliminated completely because the flatness of the right sub dominates. The sharp dip at 160 Hz is also ignored as is the response of the left sub from 200 - 300 Hz where it is much lower in level.


In general, we can conclude:
  • dips are not subtractive - they can be removed by adding another bass source that doesn't have the same dip
  • peaks sum together
  • the combined response of two bass sources is generally not an average, but it is more like the combined maximum level of the two
This has some implications in bass integration. The one that is of interest is that dips can be removed by adding bass sources together. These dips are best removed in this way rather than trying to use EQ. Bass traps are generally ineffective here.

Here is another example:


You can see the sub has a dip that the mains do not. The solution is to overlap the responses of both. So rather than crossing at 80 Hz, in this particular setup I ran the mains down to 60 Hz with a high pass at that point. The mains could in fact easily extend down to 23 Hz, however there was no need.

April 24, 2011

REW measurements - TL speakers and Rythmik Subs

This one is digging into the archives for some measurements of my TL speakers shown elsewhere on this blog. They were combined with Rythmik subs. 


Looks pretty good doesn't it? This is showing a smoothed chart of my subs and TLs combined with some PEQ to get them flat. 1/3 octave smoothing approximates what we hear, but does it hide problems?

Here is the unsmoothed version. As you can see, it's also pretty good. No real problems hidden here.


What really reveals problems is the waterfall:


The steady state response is fine, but the waterfall shows considerable modal ringing. Bass traps are needed.

This is what I get with bass traps:

The steady state response isn't perhaps quite as flat in places, mainly due to spending less time on EQ in the dark green version. There are quite a few things different (speakers and crossover settings), however the critical thing is room treatment. The bass traps make a world of difference. The real achievement in the last chart lies in getting a shorter decay time. Subjectively it's a dramatic improvement.

April 23, 2011

An afternoon with Adam Speakers


Adam are one of not too many speaker manufacturers who make active speakers for home use. I paid a visit to the home of one owner to have a listen and help with taking some measurements. I had heard these speakers in this room before and this time they left a different impression.

The first time around, they had a forward and precise sound. Out of curiosity I had a look at the rear panel controls and noted that the treble had been turned up - that explained the forwardness of the presentation. This time they were quite a bit more mellow and the level had been reduced by 2db shy of flat, which turned out to be a nice balance.

Never heard of Adam speakers?

Adam professional audio >

They make both home audio and studio speakers. The speaker in question here is the Tensor Delta. It has a 9" woofer combined with a Heil mid and tweeter. They are driven by built-in class D amps and a class AB amp for the tweeter. What you can't tell from the website is how well finished they are. The finish is pristine and the build quality exceptional.


You may notice some foam behind the speakers. I brought some along as temporary "bass trap reinforcements." You can see one of the existing bass traps in the corner on the left. We took some measurements with Fuzz Measure and in the waterfalls we could see some improvement with the four added foam scrap traps in the corners. They are not nearly big enough or the right material to fully trap a room, but they were enough for us to see a difference in the measurements.
We took some gated measurements at 1m in less than ideal conditions with boundaries a little too close. Ideally one would elevate the speaker to a height of 1.8m outdoors and gate out the first reflection from the floor. We didn't quite have the space or time so we did a "cheat measurement" using foam to damp the nearest two reflections as shown. This allows us to measure to lower frequencies. We took a series of measurements, including nearfield, farfield, and gated @ 1m.

The nearfield plots revealed a very smooth and flat response.

This isn't the normal way to measure speakers, but it is more common for a subwoofer. I took a nearfield measurement of the woofer, but the other drivers were measured that way out of curiosity.

One thing that was demonstrated was the way in which having less bass can make a speaker "room friendly." For a stand mount, these are certainly bass capable. While the room has not been tamed with extensive EQ or bass traps, the owner had turned back the bass a little to compensate. On most tracks this resulted in the bass sounding well under control.