March 16, 2022

What happens when a bass box is too large

Recently we had a client bring in a custom loudspeaker cabinet which had been built for some vintage drivers, featuring a 15" woofer. Much to my suprise, initial modelling indicated an enclosure that is much too large. More commonly, cabinet size is compromised and smaller than ideal. We usually want a box to be smaller than it could be. Hence this is a surprise when it goes the other way. This prompts a fair question: how do we decide how large a ported enclosure should be? 


How low can you go? 

 
First we consider the maximum bass extension that we can achieve with a given driver. Typically we start with the driver free air resonance (fs). This provides an initial guess at the potential bass extension. Of course, the actual potential depends on all parameters. So the quick way to find out is to model a standard alignment such as Chebyshev. Shown white in the plot below.


Green shows an EBS alignment, in which we give up 3 dB of sensitivity to achieve lower bass extension. This type of alignment involves a trade-off in which we give up maximum output in order to achieve lower bass. We should think carefully about this in this instance, as we're dealing with a 12" driver with limited output at very low frequencies. It may be worthwhile in small rooms with considerable gain. 
 
The next example (red) shows a compromise we might make to downsize the cabinet. The white alignment is 90L but we can get it down to a more modest size (65L) in this example without giving up much.

So far these are all workable choices, with typical trade offs with sensitivity, extension and size. But here is an example of a badly designed bass box - one which is larger than beneficial. 

 
Blue - an oversized bass box. In this case, the cabinet is 300L. 

What's wrong with this box?

Of course, there is always the practical issues like WAF, aesthetics and the extra challenges that go with very large boxes that are hard to handle and fit in your room. Aside from these issues, we also have a box that is hard to properly brace without it becoming extremely heavy.

Like with the EBS cabinet, we've given up some midbass punch, but we've also got an undesirable peak around tuning.

What can we do with an over sized bass box?


After the box is built, we can sometimes rescue it by changing the tuning. 


Here, all 3 cabinets have the same volume (300L) but different port tuning. We can remove the peak at tuning by lowering tuning by 2 Hz. If we tune higher, the peak gets worse (dark blue). 

So we can see that if your cabinet is larger than required for a balanced design, the best passive solution is to lower the tuning and effectively convert to an extended bass shelf design. If the extra extension isn't wanted, then there are two choices: EQ or rebuild. If EQ is used, we can overcome any sound quality issues and we expect to achieve higher SPL and hence more dynamic range. On the other hand, if we rebuild the cabinet, it's likely that we can end up with a more desirable result. The new box can be more aesthetic and we can also include more cabinet bracing, given that this tends to reduce net volume.

SPL vs extension

 
Quite commonly, audiophiles who don't understand the SPL cost of bass extension often will choose bass extension over maximum output. This is why we now have the modern trend of subs with impressive extension that actually lack the dynamic range required to fully appreciate it. There is actually no point in having bass extension to 12 Hz if you don't have enough SPL capability to actually appreciate that bass extension.

So let's compare the above alignments in terms of their actual SPL. In each case, power level is chosen to reach xmax above tuning. 


Red: 65L cabinet tuned at 20 Hz with 210 W
White: Chebychev alignment 90L tuned to 19 Hz with 160W
Green: EBS alignment 225L tuned to 15 Hz with 83W  
Blue: Oversized cabinet 300L tuned to 14 Hz with 67W

Excursion - we can see that all these subs would require a rumble filter below tuning


In the case of this specific sub, I'd argue the larger cabinets are not good choices for all but very small rooms with a large amount of gain. 103 dB modelled at 16 Hz is not a very good result. In many larger rooms in Australia, the low bass output could be very unimpressive.

On the other hand, the much smaller 65L cabinet achieves 110 dB in the midbass. If we carefully optimise position, this sub will likely offer impressive performance in a much more attractive package. The 2 dB greater output compared to the larger version will actually sound about one third louder. Bigger is not always better!

January 5, 2022

Lil Thumper build

First the internal baffles are glued together and Tnuts are tapped into place. 

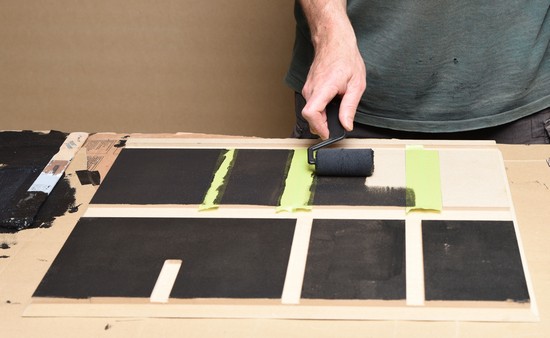
It's a good idea to seal the internals before assembly. Later, it will be difficult to access. Here I'm using Duratex rolled on. A heat gun speeds up the process so that we can move on quickly. 

Now the back and braces are laid out. You can see the braces sit into machined trenches.

 These braces are laid down first. 
 

The next bracing pieces lock into the others. When combined with the trenches on the back panel, this ensures all the braces are located in the correct positions. No guess work involved.
 

 Braces are now secured to the back panel.
 

Lining is glued in place. Here I'm using high density panels that we also use in bass traps. Normal speaker box lining is not quite so effective at damping port resonances. I've found that thicker and higher density material works much better and ensures the output is clean.
 

 The baffle is laid out and now glue is applied.
 
Lowering the internal baffles into place.
 

The first side panel is glued into position.
 

The second side is glued into place.
 

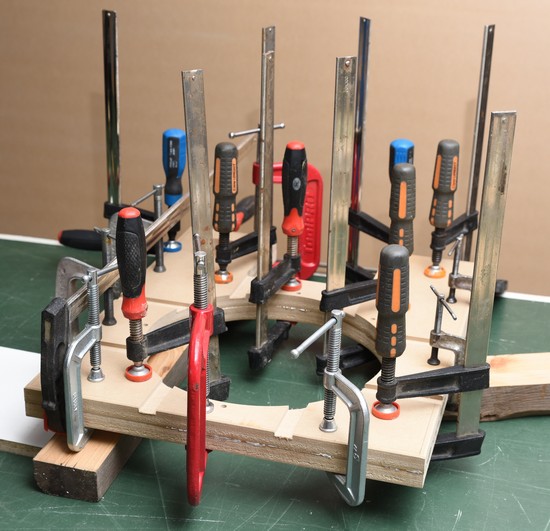
Now with the second side in place, the clamps are moved.
 
Solid timber braces put into place. These will be glued in place later. The absorber panels are already glued in place. Later, access is impossible. The unpainted parts are the trenches on the sides, top and bottom.

Top panel clamped into place.
 
This is a dry fit to show the internal structure.
 
I haven't taken photos of the assembly of the solid timber braces and the port, which has four pieces, with round overs on both inlet and outlet. There is also a brace not shown. This part of the build was fairly involved, with many panels being secured in rapid succession. It's difficult to handle the camera when dealing with polyurethane glue. 

Now with all panels in place, clamps are re-positioned. The timber here allows less clamps to be used, applying the force over a larger area. Otherwise, more clamps with small spacings are required.
  
This is the rear of the sub. A circular cut out allows the driver to be inserted into the internal baffle. The amp is then installed to a panel that goes over the top.

The enclosure is left over night, then the next day, sanded and a small roundover is applied to all the joints.

Next the driver can be installed. I like to insert string through the holes so the driver can be re-positioned. Otherwise the driver might not be rotated correctly and the pilot holes might not line up.


The driver is lowered into the internal baffle. Cables are routed to avoid hitting the cone. Foam gasket avoids air leaks.

Next the back panel is added and the sub is tested.


It's not pretty, however, this sub is now located behind a large couch and can't be seen in the room.


January 4, 2022

Lil thumper


Previously I referred to this compact bandpass sub, originally proposed for a client requesting a bandpass sub. However, I quickly realised it was ideal for another client seeking a quality compact sub for a lounge room system. This sub would be hidden behind a couch - I had already tested all viable positions in this room and determined that this particular location was ideal. 
 

 A classic driver 

This sub is built around a variant of the classic Peerless XLS series of sub drivers. 


Given the vast array of drivers now available, the classic drivers are often overlooked. However, this project serves as a reminder of that clean and articulate bass that made this series of drivers legendary. The particular variant I'm using here is the Scan Speak version - 30W/4558T00. As with all Scan Speak drivers, we see excellent build quality, including a die cast aluminium frame which is well ventilated along with an aluminium shorting ring to lower inductance. Unlike more typical modern drivers, the surround is quite large relative to the linear excursion capabilities of the driver. Hence at xmax, this driver is not in any way pushing the limits of the suspension system. The modest 51mm diameter voice coil along with the shorting ring means a very low inductance value of 0.83 mH. 

 4th vs 6th order bandpass 

A 4th order bandpass, such as we are using here, offers a few advantages. Firstly, the sealed rear chamber provides inbuilt excursion protection. Even if we aren't using a rumble filter, the driver is protected from extreme excursions by the sealed air spring in the enclosure. 6th order and ported designs don't offer this protection and this means they require a high pass (rumble) filter that is not adequate on many plate amps and which is not available on AV receivers. This usually means we need to add an external DSP device. In this case, a 4th order design meant we could simply use the DSP filters built into the AVR. The enclosure is also smaller than a 6th order design.

How does it sound? 

Exactly as expected with this driver, the bass is clean and articulate. True to its name, the bass is punchy due to its tuning. As this is a fairly casual system, mainly used for music and Netflix, this client wasn't aiming for the kind of LFE extension home theatre enthusists normally choose. From the very first test sweep it was clear that this would be a trouble free sub. 


Shown here is the nearfield response. You can see the port resonance at 520 Hz. The chamber is lined with 50mm thick high density acoustic material, which is very effective at damping port resonances. This is no the lining that you normally see in speakers and subs. It's extra high density Martini Absorb XHD, as used in bass traps. The lining typically used in speaker boxes is often not adequate for a bandpass design. 

Cabinet design

The driver is surface mounted onto a double thickness internal baffle (36mm thick) and secured with T nuts and cap screws. The driver faces a sealed chamber adjacent to the 200W plate amp. This provides excursion protection. The driver magnet faces the front chamber, which has a rectangular port. The internal baffle is heavily braced on both sides and the result is a very inert cabinet.
 

In this design I've opted for a rectangular port. It performs better than a shelf port due to reducing the surface area. A shelf port extending all the way to the sides would have higher port compression. A round port limits the options for getting the right length. In this design, I needed precise control over the port area, so that I could get it to terminate at the internal baffle. With a round port, I'd have to accept big steps in sizes. With this design, it took some careful juggling to get both volumes optimised and to have the port match the depth of the rear sealed chamber. Round ports also introduce some challenges with flaring the inside and also with build sequence. 

Flat pack

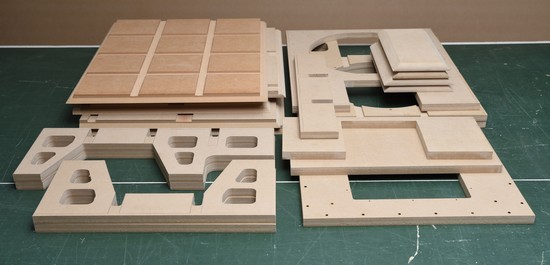
As with all our builds, a CNC machined flat pack is available.


Big thumper - 6th order bandpass sub with Dayton Reference RSS315HO

Previously I introduced this design as a custom sub offered as an upgrade to a smaller bandpass sub they initially intended.  

The driver: Dayton Audio Reference RSS315HO 

RSS315HO is a driver that works in many designs. It's a driver intended for car audio use, mainly due to its parameters which suit a small enclosure. Often the HO versions of the Dayton Reference series work well in horn designs but in this case, it also works well in a bandpass enclosure. What I like about the Dayton Reference series is that they are well optimised for sound quality, avoiding the temptation to go extreme in xmax and instead focusing on aspects that give us high quality bass when the design is right. 

Why bandpass? 

The short answer is "because the client requested a custom bandpass sub." But why would someone choose bandpass over all the other options. In the past, bandpass subs have been unfairly associated with low quality subs. Often either really cheap computer mini subs or one note noise makers. Many audiophiles after decades in this hobby have not actually experienced a serious bandpass sub. In reality, bandpass designs offer some strong advantages with serious potential. However, let's cover the downsides first.  

Why to avoid bandpass 

Bandpass subs are more difficult to design than sealed or ported designs. They are highly sensitive to misalignment. The final result can often be different to a computer model in ways that makes the final design perform poorly. Many programs are not sophisticated enough to accurately predict their real behaviour. So there is always a little more risk that the final result won't rise to the level of expectations. Further, we see higher group delay with bandpass designs, coupled with port resonances out of band that can seriously degrate the sound. Often typical speaker box lining won't effectively damp the resonances, leaving us with a sub that doesn't sound quite right. Hence, in a poorly excuted design we could see multiple compounding problems.

In a well executed design we can achieve some compelling advantages, including: 

  • higher sensitivity where we are willing to reduce bandwidth
  • reduced cone excursion for a given SPL level
  • lower distortion related to the above advantages
  • the front chamber further lowers distortion due to acoustic low pass filtering
  • greater maximum output and dynamics
  • the ability to drive a sub harder before distortion becomes objectionable

 The cabinet and bracing design

This cabinet has two main horizontal braces that also form part of the port walls. Shelf ports also form the internal walls of the ports, which wrap around the enclosure. Since all the output of a bandpass sub passes through the ports, their design is critical. Bandpass subs are typically more prone to audible port chuffing. Hence this design has very large ports with flares on both inlet and outlet of both ports. 

Build photos coming ...

A tale of two bandpass subs

Covid lockdown here in Australia has seen many people stuck at home with renewed focus on enjoying their listening rooms. During lockdown, one client approached us looking for a custom sub similar to one he had heard in the past and found impressive. He presented a fairly simple bandpass design, based around a budget 8" driver and a simple and easy to build cabinet. I could see how this design could work for people wanting an easy to build project but I had concerns about applying a bandpass design to other drivers. They tend to be very sensitive to swapping out drivers. I also felt, we could offer something far more impressive. So I presented two options. I'll call them "big thumper" and "little thumper."

Big Thumper was a large 6th order bandpass with a 1kw amp and a Dayton 12" driver. Given this is a music sub with fairly generous allowed dimensions, I was able to maximise sensitivity and achieve 91 dB voltage sensitivity. Lil thumper was a more modest animal, using an old favourite driver - a variant of the Peerless XLS range paired with a 200W amp. This was a smaller and simpler design - 4th order bandpass. That means effectively a sealed box sub with a front chamber attached. This bumps up the sensitivity and filters the distortion. Normally a sealed design would achieve 86 dB at 40 Hz (2.83V) but here with a bandpass design we can get it up to 92 dB.

This client chose to go ahead with the larger design but then another client chose to go ahead with lil thumper.

Lil Thumper - a compact 4th order bandpass sub >


September 15, 2020

The surprising reason why you might need a sub in your studio

This is an issue that comes up often in a studio consult session. Usually my services are engaged to give advice on acoustic treatment for a studio. The first thing I will do after an initial discussion is test how the monitors are performing in the mix position. This is where it's quite common to find a problem that looks like this:


The mic was placed in the mix position to show how the monitors measure in the room, as they will be used. Clearly there is no bass response. In general this is not necessarily a good reason to add a sub. Decent quality monitors are not necessarily very expensive and it's not hard to find monitors with adequate extension for most music. 

In this case, the monitors themselves were a limiting factor. We brought in a 12" sealed woofer to test the bass response. This woofer had already been calibrated for a flat anechoic response with plenty of bass extension. Here is the nearfield measurement:


Next we tested in the mix position, with comparison to the existing monitors:

We see a similar response without the early roll off. Clearly there is a room related dip of around 17 dB. This is far too much to resolve with EQ due to the headroom required. We need an acoustic solution. 

The first solution is to optimise the position of the monitors and the mix position. This tends to offer limited improvement and normally we don't effectively resolve a dip related to room modes in this way. We can reduce the depth of a null with bass traps but typically this won't remove a null this deep. In situations like this, the most effective solution is usually a sub in an optimised location.

 
We used the same woofer to test every feasible sub position in the room. One of the better positions is shown here. You can see that a sub with a little EQ removes the problem entirely. Just a little EQ is required to shape the response into a flat overall trend.  

One way to know

 
Not every studio needs a sub. The most important factor is how your monitors measure in your particular room. If your monitors have adequate extension and headroom and a reasonably flat response in your mix position, there is no great need to add a sub. It's a solution that I recommend only where it's required. When it comes to buying a sub, many studio owners have a tendency to first try a cheap sub. Whilst it's true that you can actually get decent monitors for a modest price, the same is not true with subs. Generally speaking, most subs below AUD $1500 are not up to the task. This is why I advise people to have the room tested and implement a sub only where it's needed.


May 18, 2020

Why you don't need two subs

By now you've heard it said many times "two subs are better than one." So it might come as a surprise to hear it's not always the case. Quite often it's the wrong advice. The answer is not quite as simple as the one most audiophiles seek. People like simple ideas that make intuitive sense. This is why myths in audio are so prevalent - they are simple ideas that seem to make intuitive sense, so they spread on forums. When something makes sense, people are reluctant to change their minds. My aim with this post is to arm you with the information to help you make a better choice for your particular situation.

The case for more than one subwoofer


There are only two technical reasons for more than one sub:

1. Output - you want more clean output than a single sub can provide
2. Smooth response - no single sub position can provide a smooth response in the seats that matter

There are many non-technical reasons, but I'm going to stick with what provides an audible benefit for your dollar.

If your goal is to increase output, it's worth keeping in mind that two subs can work against each other. Here is an example:


These two sealed subs have a different response due to their positions. How do they sum when measured together?


Here you can see that in the low bass range, below 43 Hz they actually  provide a less smooth response and lower output than just a single sub in the blue position!

This is where things work against those who buy subs, put them in the room and hope for the best. The point to take away here is that the benefit is not automatic. You can't simply put multiple subs into a room and get the benefit so many are talking about.

So you might be wondering when I'm going to present the case for more than one. Here it is. There are many rooms where one sub isn't enough. Here is a good example of a room that requires two.

This was a fairly typical dedicated rectangular room, with one row of seating in a good sized room. This client came to use looking for the missing midbass punch. The interesting thing here was that they didn't put it quite that way. They initially believed that they were missing bass depth. They had one sub up the front of the room:


The large peak around 26 Hz is provided by the room and it allowed a small sealed sub to punch beyond its weight. It achieved good output to near 20 Hz. But the real problem was in the midbass. There is a large recess around 30 - 45 Hz. In movies a great deal of the action lies in this range. I'd argue this region is more important than 20 - 30 Hz. We tested every possible position in this room. No single position could provide a smooth response. Hence we changed our focus to finding two positions that would work well together.

Along the front of the room, we found a better position:

Moving this sub, we removed a dip to achieve smoother upper bass. Then we found a position for a second sub that just happened to be under an existing coffee table that was large enough to hide a sub.

The second position solves the midbass punch issue. With these two positions, we now have a chance to fix the bass.

The final result was a dramatic increase in bass authority and dynamics. Movies delivered a more visceral experience that was lacking before.

The case for just one subwoofer


For audiophiles who just want the best bass in one listening chair, I've found that about half of the rooms we test need one sub and the other half are better served with two. Here is an example of one room that suits just one sub. All the positions we tested:

As you can see, the positions vary enormously. Here are a few positions that are interesting:


This client had many subs in the room, most of them in positions that aren't effective. One of them was in the blue position, which performs very well for 2 channel. The orange position is one of the worst. I've shown it here to give an idea of how badly the room can impact the response. The black position is similar to one that he was using, but you can see it provides a lot more free output. In this room, only one sub is required with moderate EQ.

This room is one of the best I've seen for using just one sub. Yet surprisingly, they had many subs running in the room. The message here is clear - always test the room before you decide how many subs you need.

It's surprisingly common for people who just need one sub to have several. If your plan is to buy a sub then hope for the best, I always recommend just one sub. Where you want to take the next step, my advice is always the same. Test the room. This means either learning how to do it, or engaging a service like ours to do it for you.