Download WinISD from Linearteam >
1. Starting your project
First click on "new project" and select your driver from the list. If it isn't included, see the next section below. Select the box type - sealed, vented, bandpass. Then select an alignment.
Sealed box - start with a Q of 0.707
Vented - not critical as you will end up tweaking it anyway
2. Getting Started - Adding a new driver
Often you have to manually enter in the driver data where it doesn't exist in the built-in database. People often get stuck here as the parameters shown on a data sheet will result in errors. The correct way to enter the parameters without errors is shown in my blog post about entering a new driver > It also includes a quick video demonstration.
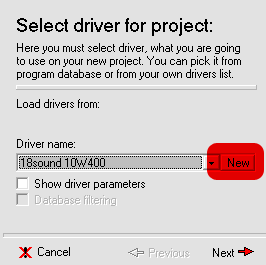
Click new to add a new driver.
3. Choose box type and alignment
In this example, I've chosen the Peerless XLS 12" driver which is already in the database. It's in a vented box, shown below with the box chosen by one of the box alignments included with WinISD. It doesn't matter which you chose (I never follow them anyway!)
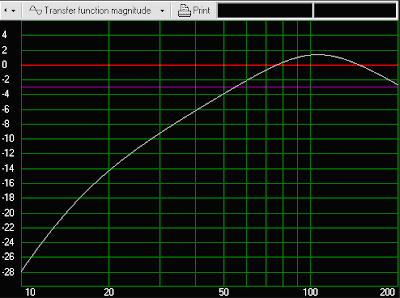
So far the response doesn't look good! Let's see why:
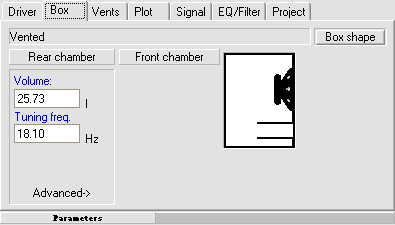
The box is too small and the tuning is too low. The size of the box affects the efficiency of the vent. If we made the box larger, yet kept the vent tuning the same, the vent output would increase. We can see this below where the yellow trace shows an oversized 150L box.
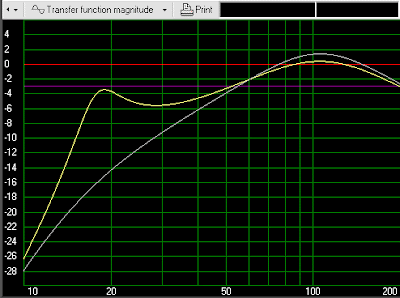
The two peaks with the dip in the middle tells us that the design needs work.
This particular driver has a strong motor which gives it a low Qts, causing early roll off.
4. Modify box parameters
More sensible numbers: 60L volume and 20 Hz tuning
5. Enter filter settings
On the EQ tab, enter the following parameters:
Low pass - 2nd order, 50 Hz
High pass - 3rd order, 20 Hz
Static gain - 6db
The low pass is the crossover point you see on the dial on the plate amp, 2nd order is typical. The high pass is a "rumble filter" the filters out low frequencies below the tuning point. This is necessary to keep the cone under control. Static gain is simply to make the chart easier to read, so we can see where the -3db points are (purple line).
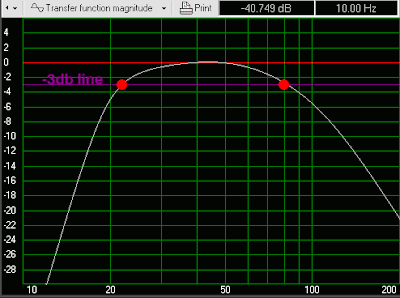
You can see the -3db points at 23 and 80 Hz.
Notice two things:
1. The setting for your crossover isn't where it will actually cross
2. The hump at 100 Hz is now gone - we've filtered it out
If you have a data sheet for your plate amp, then you should aim to match it's response with your filter settings.
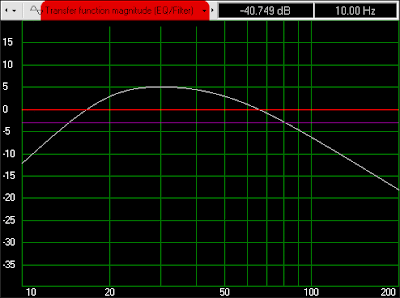
To change the chart displayed, click on the red area. Shown above is the filter response. This is what the filters are doing.
6. Find maximum output
EQ tab - disable static gain
Signal tab - enter power from your amp
Now view the cone excursion chart and increase the input power until you reach xmax (see red line).
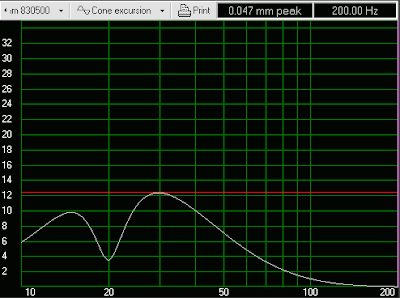
Notice how the excursion below tuning is lower than the peak which occurs around 30 Hz. This is due to the rumble filter. A third order filter at tuning will achieve this. When using a plate amplifier, you will be limited to what has been designed for it, but ideally if you have a choice, 3rd order is ideal. Let's see what happens without a rumble filter:
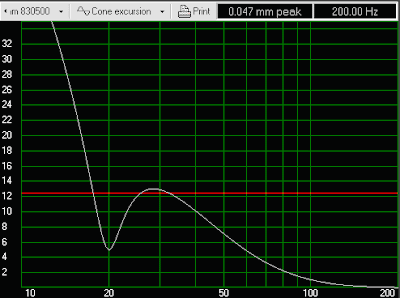
The driver goes out of control and when played at this level, which would be safe with the filter, we now have potential damage. Instead of enjoying your movie, you jump out of your seat and run to your subwoofer to turn it down as you hear it bottom. If there is a lot of deep bass as found in many movies, you'll have to turn it down a great deal.
SPL:
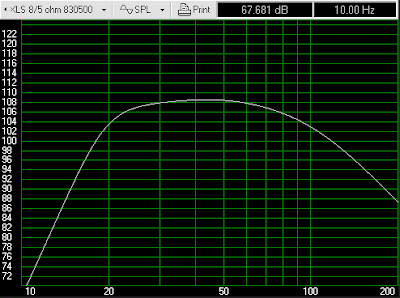
We've now found the maximum output of the sub.
7. Vent design
First we'll start with a 100mm vent. The length is 932mm and we select the end correction for two flanged ends. At this point you need to work out if you can fit such a vent inside a 60L box.
Now let's check the vent velocity.
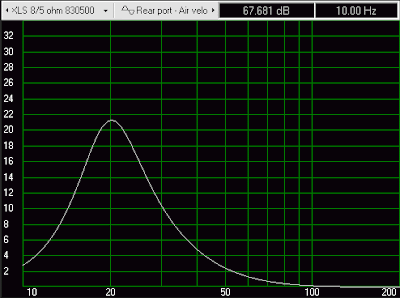
You can see the peak occurs at tuning. How do you know what velocity is acceptable? This is a topic of it's own and is covered here >
Let's see what happens without the rumble filter:
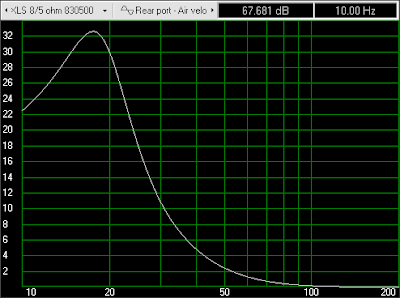
Now the vent velocity is far too high. The result is both audible chuffing and port compression. We now have poor performance and the driver itself also suffers potential damage. One thing should now be clear - you need a rumble filter for a vented box!
Juggling compromises
To get a good design, you will need to juggle different compromises and cycle through different changes. Each change will affect other areas. If you decide the vent won't fit, then you might make the box bigger - that will mean the same vent can be shorter as the volume is part of the equation affecting the required vent length. This in turn affects the excursion and amplifier input power you can use. You can save your project, then open a second instance of it for comparison. You then show different versions on the one chart.

can you help me calculate a box and vent for a 1230w infinity ?
ReplyDeletei'll give you the spec.
i hope you will answer me into email.
thx