February 7, 2012

F20 build pics

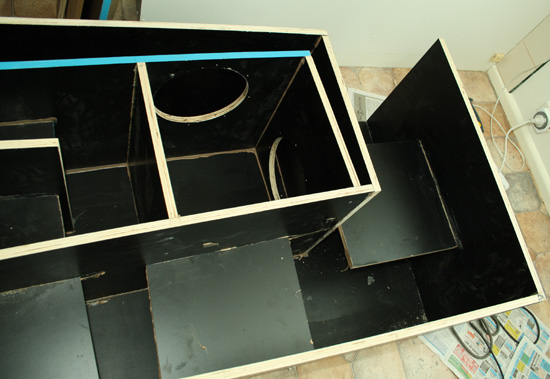
F20 assembled:


February 4, 2012

More progress - AE TD18 bass bins and F20 bass horn

Two bass bins now assembled sans outer baffle. 


Internal bracing:


I wasn't quite careful enough drilling into the ply, so it split apart. I used polyurethane glue to repair it. In the past I've used PVA but it's difficult to get the glue in. With PU glue it expands to fill the void, so that it pushes the glue both into the void and out. The glue seen on the outside is there only due to the expansion. This glue is four times stronger than PVA.


F20 part-assembled:


Driver cut-outs were done with a router jig:


Bass horns in progress

All sheets now cut for two bass horns - F20 (lilmike's design on AVS) and T20 (dual Rythmik tapped horn). 

T20:


F20:


What you see is low cost Chinese form ply purchased for the same price as MDF. Not recommended as a rule but my T20 will be installed out of sight - it simply needs to be light and strong. It is quite a bit lighter than MDF and needs less bracing. 

Acoustic Elegance TD18H active woofers

100L sealed boxes in progress for Acoustic Elegance TD18H active woofers. Built with 18mm marine ply. Being low cost imported ply there are obvious shortcomings - voids can be seen in the cuts, but at around $80/sheet there isn't much to complain about.


The bracing is very simple. Just one horizontal and vertical matrix brace with a driver cut out. It isn't necessary to cut lots of holes in the braces, the volume gained is minimal, the braces are weakened and more effort is required.

Cutting braces:


Clamping and gluing bracing together:


Cutting driver holes:


If one cares about the appearance of the cut out that will not be seen, a router can be used to cut the full depth. However, these days I prefer to do things quicker so I start with the router, but don't go full depth. I then cut with the jigsaw. (That isn't me above, as always I'm the one taking the photos.)


Progress so far:


This box is very simple. The outer baffle needs to be added, then the other fives sides and the box is assembled.


February 1, 2012

Two 20 Hz bass horns


1. Lilmike's F20 modified to suit dual AE 10" drivers (PB10) - a front loaded 20 Hz bass horn
2. Rythmik T20 - a dual opposed tapped horn with dual 12" drivers


Black: T20 (Rythmik) 2 x 12"
Grey: F20 (AE) 2 x 10"


Black: T20 (Rythmik) 2 x 12"
Grey: F20 (AE) 2 x 10"

T20 has more output but it is due to greater cone area and excursion. F20 needs 80w in total and a high pass at 25 Hz for max SPL. T20 can use all of the power in the plate amps (2 x 370w) and needs a high pass at 20 Hz. 

Both of these will be constructed from formply at the same time, measured and compared. 

January 29, 2012

Rythmik dual opposed tapped horn sub - sims


Black: simulated
Magenta: measured sealed sub (right corner)
Orange: measured sealed sub (rear corner)
Grey: measured sealed sub (left corner)

January 26, 2012

80L CSS SDX15 sub - part 4

Edges trimmed:


Edges were trimmed with the hand plane. You might notice the gouges where I've used the plane. Unfortunately I was in a bit of a hurry at the time and didn't check the blade. On closer inspection later I found that it had been damaged and needed grinding back. The gouges aren't a serious concern because they will soon be covered with bog anyway. 

Filling holes:


Bog filler applied over butt joins, then sanded:


Next up, I applied a roundover to the edges, 3mm on the bottom edge, 6mm to all others. 


I also cut a groove at the join. The idea here is to conceal the join so that if any cracks appear over time, they will be hidden in the groove.


Clamping the feet. Fixed with polyurethane glue, chosen for its very high strength. It is four times as strong as ordinary PVA and expands when curing to ensure a good bond. The oozing glue was wiped over the edges to seal them up.


Preparing for painting over MDF butt joins

Have you ever seen an MDF box where paint has been applied over butt joins? In virtually every case where great care isn't taken, a hairline crack appears. It is caused by the ends of the MDF soaking up paint and then expanding more than the rest of the material. How am I handling this?

Firstly, I've cut a groove at the join so that any cracks will be concealed if they appear. Secondly I have buttered up all the edges with two part bog. This will tend to avoid the edges soaking up paint. I've also applied polyurethane glue over the edges as a second layer. The plan is to spray the box with automotive paint with a satin black finish.