July 31, 2011

Acoustic Elegance PB12 dual opposed sub

This weekend’s project was to change a 6th order bandpass sub into a dual opposed sealed sub with the Acoustic Elegance PB12 driver. 


This sub belongs to Roger (Antripodean). The original wasn’t designed with the driver in mind and had a very limited bandwidth. It contributed very little to Roger’s system


So we blocked up the vents and cut the necessary holes. The net volume is around 80L.


The driver has a poly cone, cast basket and a high quality motor.


Nearfield response:


You can see how the response is quite smooth and extended for a sub driver.

Farfield response when integrated into the system: 

We placed the sub in the middle of the front wall and ran some quick measurements to integrate it into the system. Initially we ran it up to 300 Hz and there were some localisation issues. The integration was better with a 200 Hz crossover and I tweaked the target curve a little more prior to the last measurement to increase the bass level. The lower midrange was a little tubby at first.

The final result was quite good and it performed well and made a good account of itself. One thing I did notice was the lack of cabinet vibration as a result of the dual opposed mounting arrangement. 


July 19, 2011

Bass trap positions

Does a given bass trap do the same job in different positions? Here is a measurement showing an empty room (grey), and a single trap on the left side front (red) and rear (green).

You can see that below 100 Hz the front corner closer to the speakers is a little more effective, but around 120 - 160 the rear corner is a little smoother.

In this example, the trap is a very small foam one which is not very effective. You can see slight differences with the right front corner (dark grey) and left rear corner (blue).

July 16, 2011

Unity horns for sale in Australia

Rare opportunity to buy one of only two Unity horns in Australia!


See it on StereoNET >

If you aren't familiar, these are designed by Tom Danley and they are a coaxial 2 way horn where a compression driver and four 6" mids share a horn. There are only a few ways to get a coherent point source speaker with very high efficiency, all of them require a coax arrangement.

This is an effortless speaker that despite its large size, can work well in a small room and with low power amps.

July 14, 2011

Audio books

With so much free information online, it's tempting to ditch traditional books. However, the quality of information in published texts is usually significantly better. One option you might like to consider is buying digital copies. Let's consider an example.

Sound Reproduction
Floyd Toole


This book is a must read! If you don't at least have a copy, this should be a moment of embarrassment! If you buy it in an Australian book store, expect to pay around AU $70 and about $10 postage - $80 in total. You can buy it from the US for about $45 + shipping. There is a much more appealing option however. You can buy a digital copy for $36. In less time than it takes to walk out the door, you could be reading it right here.

Consider the benefits:
  • cheaper 
  • no waiting for stock and for shipping
  • no doggy ears
  • no taking up space (I'd rather free it up than add more books)
Buy it at Amazon:


After digging around, this is the best price I have been able to find. As I am an Amazon "Associate" I do get a small commission on sales from links placed here. So if you are planning on buying it, you'd be doing me a favour clicking on the links here.

I will be adding a review of this book soon. You need to download Kindle from Amazon to view the digital version. You can also view a free sample.

Warning about Kindle version

The illustrations are very difficult to read in the Kindle for PC version. Here is an example:


Certain parts are illegible - see the small text. You can actually figure things out but it makes it difficult and tedious. A zoom function isn't provided and the illustrations just don't suit the Kindle application well. It would be fine with larger illustrations and text. This problem is an issue with this particular book, but the Master Handbook of Acoustics is fine. I have contacted Amazon about the issue and they may or may not make changes as a result. I'm sure I'm not the only one with this issue.

Another book that I'd call mandatory reading:

Master handbook of Acoustics
F. Alton Everest


This is an ideal text for anyone interested in room acoustics, whether novice or professional.

The Kindle edition is dirt cheap at only $17!

Buy it now from Amazon >

The illustrations are more clear and easier to read - no problem with Kindle for PC. The Kindle version is also dirt cheap, making it more appealing. 

Other audio texts at Amazon:

Loudspeakers: For music recording and reproduction [Kindle Edition]
Philip Newell, Keith Holland


NASA - 3-D Sound for Virtual Reality and Multimedia

July 5, 2011

RFZ - what it is and why do you need it

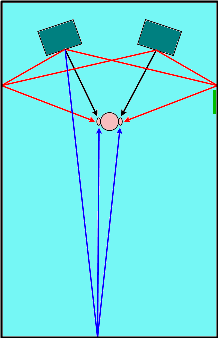
The concept of a reflection free zone (RFZ) is almost exclusively discussed in studio control rooms, but a similar approach is worth considering in domestic critical listening rooms. The approach is simple. Early strong reflections are reduced but diffuse reflections with a longer time delay are retained. The result is greater image focus and clarity without making a room sound dead.

In studios this approach has gained widespread acceptance, but in home audio it is perhaps controversial. According to Toole (Sound Reproduction), side wall reflections are in fact desirable to create a sense of spaciousness. The size of the image is increased and the overall sound is often enhanced. Most in fact would probably prefer to have side wall reflections. So it is best to consider this concept as one worth understanding and trying, even though it might be something that you prefer. Consider it a tool to add to the box of tricks.

Image courtesy of Ethan Winer (Real Traps)
In the above illustration, early reflections are shown in red, longer reflections in blue.

Why early reflections matter

The problem with early reflections is that they are not so easily distinguished from the intial direct sound. The rule of first arrival indicates that the first arriving sound determines our perception of sound origin, however it does appear to be true that early reflections in the first 10 ms, being strong in level, can have a significant impact on imaging. More delayed reflections tend to be lower in level and are perceived as ambient sound that gives each room a sonic signature. As a general rule, the earlier the reflection and the higher the level, the greater the problem.

Let's consider a conventional stereo setup as shown below:
The speakers are arranged in a 30 degree equilateral triangle with a 3m listening distance. The offsets to front and side wall are made different due to SBIR issues. This kind of setup would be considered quite good by most and many would be happy with a room arranged this way with no added treatment at all.
Here the first reflection points are shown in red, with a more delayed reflection off the back wall in blue. The fact that the speakers are brought in and that the listening position is relatively close does help here, but we could certainly improve on this setup.
Here absorbers have been added so that the earlier reflections have been reduced. Image clarity is improved, and the bass traps will also clean up the bass, but the room is starting to sound a little dead. A diffusor on the rear wall takes away the reflection point and avoids making the room too dead. The room sounds bigger.
The next step is to flush mount the speakers in what might be either bass traps, or more solid structures. This design does not need as much absorption, so the room can now retain a little more ambience.
Taking the idea one step further, an added deflector eliminates the need to use absorbers.

July 4, 2011

An example of overlapping mains and subs

Mains are DIY TL speakers. Subs are Rythmik servo subs. Left and right combined in each case. EQ applied after they were combined together. Subs and mains were allowed to overlap in response.

July 1, 2011

Baffle edge diffraction

Baffle edge diffraction refers to the way in which sound travels laterally across a speaker baffle, then diffracts when meeting a sharp edge. This creates a secondary delayed acoustic source and is believed to degrade imaging. The effects are visible even in a frequency response plot. They can be reduced by rounding the edge significantly, using foam or soffit mounting.

Etude TL variations

Coming soon

Active version
Different drivers

Etude HT speakers


Main TL speaker page.

The crossover for the Etude TL is quite flexable and is easily adapted towards creating a timbre matched complete surround system. This article outlines some modifications to suit a centre and surround speakers.

Speaker location

It's important to first consider where the speaker will be located. There are three likely scenarios: free-standing, on-wall and flush. They each have an impact on how the adjacent wall reinforces the sound.

When free-standing, bafflestep compensation is required. In this design, that is provided by the second woofer. As a result, any speaker that is free-standing, whether main, centre or surround, requires the standard crossover with two woofers.

When flush mounted, the bafflestep compensation provided by the second woofer is not required. As a result, the response below 200 Hz is boosted by 3 dB. This could result in a muddy sound. This problem is eliminated by removing the second woofer along with its associated crossover network. The box volume can be cut in half and the cost is reduced. On-wall mounting is an in-between option that is probably closer to the flush mount scenario.

Mains - sealed vs TL

In a 5.1 or 7.1 channel system the need for TL mains may be questioned. If you prefer a sealed version, allow 9L of net volume per woofer with the box lightly filled with dacron. A predictable 2nd order roll-off at 80 Hz will be the result. This is easy to cross to a subwoofer.

Often it is worth letting the TLs run lower as having two extra bass sources overlapping with the subs can result in a smoother in-room bass response. This is discussed and illustrated in my bass integration guide article

Centre speaker

If you have the mains under a screen, then the ideal setup includes three idential TL mains across the front which would be freestanding. If they must be placed close to the wall due to space limits, you may consider leaving out one of the woofers. The vent should have 100mm clearance to the wall. In this case, the wall behind the speakers should be treated with relatively thick absorption - 50mm or greater is suggested. As the speaker is moved away from the wall, reinforcement is lost and the second woofer becomes necessary.

A more typical scenario involves a smaller centre sitting horizontally. This is the worst possible arrangement as any seat that is not directly in the middle will result in the mid and tweeter becoming misaligned, as shown below:
The woofer is not critical due to the lower crossover point, but the relative distances to tweeter and midbass are important. The ideal seat is actually slightly towards the right of the centre seat, but when moving further to the sides you can see there is a misalignment, causing destructive interference. Vertical alignment of the tweeter and mid eliminates this problem.

The simplest has a vertical sealed box. Perhaps a more appealing version mounts the tweeter over the midwoofer, then puts the other woofer on the side. The asymmetry can be hidden with a grille. In that case I would have the grille only over the woofer and set the midwoofer forward so that with the grille in place, the front of the grille is flush with the baffle around the midwoofer. This avoids baffle edge diffraction.

Surrounds

Surrounds should be placed on side and rear walls with a low profile and the second woofer removed. The box should be lightly filled with dacron with an internal net volume of 9L. You might also consider flush mounting where a sealed box is installed in the wall cavity. This completely avoids baffle edge diffraction and also offers a neat solution, although sound isolation considerations do also come into play.

For side surrounds and one row of seating, you may opt to orient the tweeter and mid horizontally as with many centre speakers. With just one row, a horizontal alignment avoids misalignment of tweeter and mid with various seats along the single row. In each case, both horizontal and vertical alignment aspects should be considered over the range of seats covered.

Option summary

With the information provided here, you can now make some choices:

1. Budget vs higher quality crossover

A budget version of the crossover uses electro caps. You might choose this option for surrounds that many consider less critical. Keep in mind that such caps are less stable over time. Otherwise, omit the caps shown in yellow and use better quality caps.

2. Flush or on-wall vs free standing mounting

For a free standing version, build the crossover as shown with two woofers. Otherwise, you can leave out the second woofer and its associated crossover network. As a general guide I'd suggest building surrounds on the wall. With the centre speaker you have to consider the conditions involved as it could go either way.

3. Vertical vs horizontal mounting

For surrounds this depends on the distribution of seating. Choose the option that results in lesser misalignment of tweeter and mid.

Main TL speaker page